
BSNES is a powerful tool with vast customization options that can be tailored to your specific requirements. To make it easier for you to get the most out of BSNES, this page has been designed to provide an overview of all the features available.
Upon first launch, BSNES will only feature 3 tabs namely System, Settings and Help. Load a SNES ROM and it will provide you with an additional tab called Tools. From here-on we will begin to summarize tabs from left to right and cover each function in detail.
The first option – System – is your main tab where users will load games, reset the emulator and enable usage of the controller ports – like you would if you had a physical Super Nintendo console in front of you.
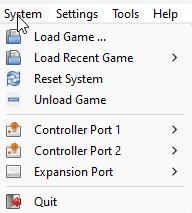
As the name suggests, here you can load any SNES rom in a filesystem browser – given it’s in a compatible format. All SNES roms/games are in a .SFC file extension. With BSNES you don’t need to extract the compressed file, just simply open or import the zip file and it will start immediately.
Up to 9 Games will be listed here that you’ve recently played – in order. This is useful to quickly navigate between games without the need of manually searching and loading games.
A feature to restart the emulator when needed. Crucial for editing and adding specific changes or when experiencing issues with the emulator.
Removes and unloads your current SNES game.
As with an actual SNES console you have two ports in front. BSNES allows users to utilize those ports as well, with multiple options available at your disposal.
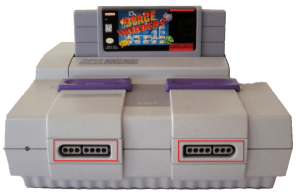
The first port is where you will use it as your main controller port, most likely being an actual controller (PlayStation, Xbox, Nintendo, Generic etc.) or keyboard & mouse that replicates a SNES controller.
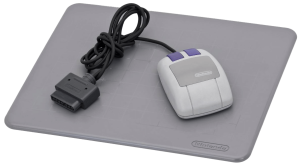
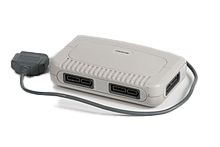
On default its already selected to Gamepad (SNES controller) and give you the options to remove (none) or add a SNES Mouse – Yes, SNES even had a mouse back in the day and looks like this.
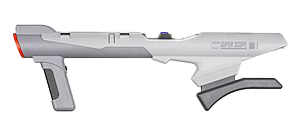
The second port allows you to add more SNES peripherals to your emulator such as a Super Multitap, Super Scope or Justifers whilst supporting Port 1’s features.
So if you do want to play games that supports any of those peripherals, make sure its ticked under controller port 2 before configuring the buttons under Settings > Input.

The EXT or Expansion port that sits underneath the Super NES console was only used in Japan for the Satellaview.
The Satellaview was a retail satellite modem that was made specifically for the Super Famicom. It was never released in America or Europe, and was quite pricey at ¥18,000, which was then nearly $200. The Satellaview, a Nintendo developed and sold the device, used the St. GIGA satellite radio service, through which game data was broadcast during a special segment called Super Famicom Hour. During the broadcast time people could download games to the Satellaview’s internal memory or an optional Memory Pak.
Unlike competing services, the Satellaview did not have online multiplayer due to the one-way nature of satellite radio. However, limited amounts of data could be sent back through the radio connection; quizzes and other competitions which allowed players to submit answers were common.
Until 1999 the Satellaview service was controlled by both St. GIGA and Nintendo. After 1999 St. GIGA was the sole controller of the service, as Nintendo broke its partnership with the radio station due to a dispute. However, the service was only turned off in 2000.
A button to close the program. Can also use the “X” in the top right corner to quit the emulator.
Apart from emulating a Super NES, the Settings tab is where users can modify and edit the emulator to their needs and ultimately enhance game visuals to run smoother and with better graphics than an actual Super NES console
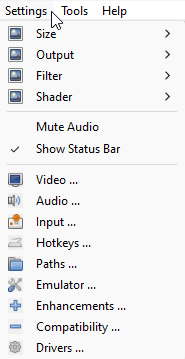
5 x video scales to choose from that will enlarge/reduce the windows sizes – 240p, 480p, 720p, 960p, 1200p. As well as options to quickly shrink window to selected size (if full screened) and a function to place your window in the center of your monitor.
By default your output will be on Scale, with additional full screen options where you can stretch the video to your resolution or place it in the center with recommended maximum size (1200p).
Beneath the scaling options you have Aspect Correction enabled – this will automatically match the aspect ratio produced by the original console hardware, mostly in 8:7 but some games are made in 4:3 ratios. No need to change but toggle as per your needs.
The Show Overscan Area, will add black margins on top and bottom of your window. This preserves its aspect ratio, so that you can see the whole picture.
Hires or High-Resolution Blur Emulation is switched off by default as only a few games requires this feature (Jurassic Park and Kirby’s Dreamland). Although filters and shaders fix pixelation and improve game visuals, you might stumble upon blurred images or text – toggle this feature for better viewing.
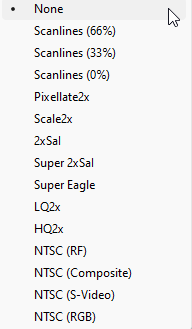
Pixel-art scaling algorithms or a Filter are graphical filters that are often used in video game console emulators to enhance hand-drawn 2D pixel art graphics.These filters will add a modern HD feel or a more nostalgic look to your games.
BSNES has plenty of integrated filters to choose from. As per image below, go through the list and select a filter to enhance game graphics.
On top of adding above mentioned Filters, you can also enable a Blur Shader.
Blurring simulates the limited horizontal resolution of standard-definition TVs by blurring together horizontally-adjacent pixels. For hand-held consoles, this simulates the slow response time of the cheap LCD screens these consoles used by blending each output frame with the previous one. Games like Jurassic Park for the Super Famicom
By default this is disabled.
Mute Audio causes BSNES to not output sound from the emulated console – however, the sound hardware is still emulated.
Switched on when booting BSNES, the Status Bar gives you all kinds of information – ranging from verified ROM data, whether the game is currently paused or unloaded and the current emulation speed captured, in frames per second.
Color Adjustment settings adjust the colour and brightness of the emulated console’s video output – with additional idling effects.
This tab contains options that affect how BSNES reproduces the emulated console’s audio output.
The first thing you’ll do before playing games – configuring your controls. Here you can map buttons on your controller or keyboard and mouse – and add SNES peripherals on either port number.
You can map up to 4 controllers per port and pause, block or allow input when emulation is out of focus and switch up your turbo rate, depending on how fast you want turbo. Read our default controls and controller setup guide here.
A dedicated section to configure shortcuts to your emulator. Many useful functions can be found here and should be configured after mapping your control keys. Popular shortcut settings include Fullscreen mode, Save/Load states, fast forwarding, toggling supersampling and much more.
If you like to keep things organized on your devices, then path directories will manage to help keep all your SNES related files in order. Create folders for each section (Games, Patches, Saves, Cheats, States and Screenshots) and assign their designated paths for easy access.
More emulation options for BSNES like auto saving games, warn when loading games that have not been verified and allowing windows screen saver during emulation.
Native file dialogs is a tiny, neat C library that port-ably invokes native file open, folder select and save dialogs. Write dialog code once and have it pop up native dialogs on all supported platforms.
The Fast Forward frame skip setting is how fast you want the game to be sped up once the Hotkey is pressed. By default it’s on max speed. You can also configure the frames for Rewinding your games. Configure your shortcut under Hotkeys for Rewind and test your desired frequency rate.
Run-ahead is the name for a very interesting technique that can be used to remove the internal processing delays in emulated video games, resulting in input lag reductions of entire frames – You can read in detail how Run-Ahead works here.
Most modern computers will run BSNES smoothly and won’t require overclocking settings, if you have an old machine or a low spec’s computer lying around, overclocking the system might give you better performance.
PPU Fast mode enabled, maps and accelerate the Physics Processing Unit’s registers to the CPU quicker.
Deinterlacing is the conversion of content from an interlaced to progressive video format. The deinterlacer is usually the first step in any format and frame rate conversion processing, so it is absolutely critical to retain the highest possible quality at this stage.
A sprite is a two-dimensional (2D) graphical object used in computer graphics, particularly in video games. It typically consists of a bitmap image or a series of images that are combined to create an animation. SNES can have 128 sprites, and two sizes between 8×8, 16×16, 32×32 and 64×64. Only two sizes can be picked for a particular screen, and each individual sprite can be individually set to either “large” or “small”. SNES can draw 32 sprites per line, and up to 34 sprites converted down to 8×8 sprites, per scanline.
The resolution Mode 7 is rendered at. Higher setting drastically increase CPU usage. “disable” uses the classic Mode 7 code, disabling some of the following features. (defaults to 2x, to show the effect with the smallest possible CPU impact)
Whether and how pseudo 3D perspective are optimized, avoiding limitations of SNES integer math.
Allows basing every resulting pixel on the average of multiple pixels. At 1x scale it allows using the higher precision at the original resolution, e.g. for use with CRT-shaders. At higher resolutions it is basically expensive anti-aliasing. (defaults to “none”) Keep in mind that to estimate the performance impact you have to multiply(!) this value with the “scale” value.
How to handle Mosaic effects on Mode 7 backgrounds.
DSP (Audio) or Digital Signal Processor is a processor dedicated to number-crunching digital signals like audio. They’re designed to perform mathematical functions like addition and subtraction at high speed with minimal energy consumption. With fast mode enabled, audio will be registered and processed quicker.
Audio interpolation is a method of making digital audio sound better than it really is. Cubic interpolation is basically an algorithm that tries to reproduce a more natural waveform by “bending” the interpolated points around the original samples. By default, this has been disabled, to play the original SNES game sounds.
A coprocessor is a computer processor used to supplement the functions of the primary processor. Operations performed by the coprocessor may be floating-point arithmetic, graphics, signal processing, string processing, cryptography or I/O interfacing with peripheral devices. As mentioned previously with Fast mode enabled – loads much faster.
Prefer HLE or High-level emulation and low-level emulation (LLE) refer to methods used when emulating components or entire systems. They’re used to differentiate approaches to system implementations by how each emulator handles a given component; a higher-level emulator abstracts the component with the goal of improving performance on the host, sacrificing the thorough measures needed to guarantee the correct behavior. The simplicity of most classic consoles allow low-level emulation to be feasible, but the exponential increase of processing power in newer consoles has necessitated the need for abstraction. Because high-level emulation can often be seen as a simulation, BIOS dumps and other machine-specific code that would normally enter the legal gray area of backups are usually not required.
A hotfix is code – sometimes called a patch – that fixes a bug in a product or in this case, SNES games. Even commercially licensed and officially released software sometimes shipped with bugs. This option will correct certain issues that occurred even on real hardware.
These options are made available to emulate bugs in ZSNES, older Snes9X releases and ROM hacks to increase compatibility;
Entropy, the measure of a system’s thermal energy per unit temperature that is unavailable for doing useful work. Because work is obtained from ordered molecular motion, the amount of entropy is also a measure of the molecular disorder, or randomness, of a system.
CPU multiplication and division (FAST math) take time to complete on a real SNES. Older emulators did not simulate these delays and provided results immediately. Some older ROM hacks do not wait for math operations to complete and need this hack.
You might have noticed while playing hacks on bsnes some sprites and other graphics don’t load correctly and are just a garbled mess along with the sprites just not working at all. This is due to bsnes having a higher accuracy than other emulators and requires no VRAM blocking to be ticked. Blocked VRAM (unticked) is recommended for playing original version 1.0 roms.
If you are experiencing broken music or the game crashes when completing the level like older Super Mario rom hacks – ticking the Echo shadow RAM will fix this issue.
A section for video, audio and input drivers to support and be compatible on all systems – be it new or old.
Depending on your graphics card you have a few options to choose from. OpenGL, Direct3D, DirectDraw and GDI is available with a feature to reload the driver. You can also select which monitor the emulator should be in full-screen mode with additional settings.
When it comes to audio, you have several driver options at your disposal and the easy-to-use reload button. BSNES makes use of the Windows default sound device; if you wish to alter BSNES’ output device, this is the place to do so.
The tools tab – specifically made when a SNES game has been loaded and helps you to manage saves, record and capture video for streaming and enabling in-game cheats.
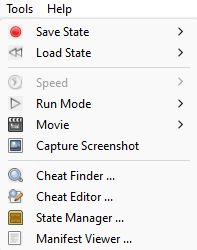
Saves your game locally – at anytime with up to 9 Saves – and no longer required to save within the game. It is however, recommended to use in-game saving and Save States to ensure proper backup of saved games – incase of corruption.
Quickly load and manage your previous Saved States.
Change how your emulator is running by utilizing normal mode, pausing emulation or manipulating frame advance – also known as slow mode or movement per frame once hotkey has been pressed.
The movie option is where you can record your gameplay. Perfect for streamers!
Captures the current in-game screenshot and stores it in a bitmap file.
The Cheat Finder is used to hack SNES games manually by finding and editing the hex values.
To enable cheats for any game within the BSNES (SNES) Emulator, load the rom game and head over to the Tools tab. Click on “Cheat Editor” and then “Find Cheats”.
A new screen will pop up that allows you to enable some – or all the cheats available per SNES game. Once you’ve chosen the cheats you want, click on “Add Cheats”, close the window and go back into the game for changes to take effect.
The State Manager allows you to create, load, and remove Manager states.
BSNES uses a “manifest” to describe how the various parts of a game cartridge are wired up together. The Manifest Viewer lets you examine the configuration bsnes is using for the loaded game.
For most consoles, a manifest isn’t strictly necessary: the raw game data provides enough clues for emulators to guess the circuit board configuration, or at least to guess a reasonable configuration. However, relying on such heuristics often leads to problems.
Manifests provide a way to describe exactly what hardware configuration to use, no guessing required, avoiding all these problems entirely.
The help tab gives users more information regarding the developers that created these awesome emulators!